Jan 28 2010

flash techniques: inspect detail with a magnifying glass

Does anyone still use Flash? Okay, I admit, I do. I have a little library of useful tools and this is one of them. How many times have you embedded an image on your website and then decided that you needed to have an enlarged version for more detailed views?

This has an obvious drawback–piracy of the enlarged image is one. If a detailed view of a portion of the image is all that is required–for example, for inspection of intricate designs or to focus in on map details–this is a way to accomplish magnification without giving away your work. View an example.

The requirements are Flash (of course) and a little bit of Actionscript know-how. This example uses Actionscript 2.0 so it can be accomplished using venerable versions of Flash, beginning with Macromedia Flash MX and more recent.

The first thing you need is a large version of your image from which a smaller version will be made.

The small image will be sized to fit in your webpage layout. For this example, I wanted the image to be 480 px wide.

The magnification will be 2.5 times, therefore the large image would be 1200 px wide (480 x 2.5 = 1200). The image you choose should be at least 1200 px wide.

In Photoshop (or another image editing application), File > Open > (your large image) Now is a good time to save the image with a new name so that you don’t accidentally ruin the original. I saved the exmaple image as large.jpg (the image can be any format that Flash recognizes: .jpg, .gif, .psd, etc.)

Re-size the image to be 1200 px wide: Image > Image Size… Make sure the resolution is set to 72 ppi (A) and change the pixel dimension to 1200 px wide (B).

Now, save the image as large.jpg.
(File > Save As…)

Once again, re-size the image (Image > Image Size…) but this time the pixel dimensions will be 480 px wide (or 2.5 times smaller than large.jpg). Remember the height dimension— it will be needed in Flash.

Save this as small.jpg.

Open a new Flash file. If using CS4 be sure to specify Actionscript 2.0, not 3.0.

The stage size will need to match the size of small.jpg: Modify > Document…

In the dialogue box enter 480 px wide x the height dimension of small.jpg.

Import small.jpg to the stage: File > Import > Import To Stage…

Position the image so that it completely fills the stage. In the Properties palette, change the position to x: 0.00 and y: 0.00.

Rename the layer: small (A) (Note: rename the layer by double-clicking on the layer name to enter edit mode.)

Create a new layer (B) and rename it: large

At this point you should save the file: File> Save As…

The large image will be loaded into a Symbol: Insert > New Symbol…

Give the symbol the Name: large_mc and the Type: Movie Clip

This will open the new blank movie clip. Into this, import the large image: Import > Import To Stage…

Set the position to x: 0.00 and y: 0.00

Return to the main stage by clicking “Scene 1” in the upper left of the project window:

Click on the keyframe in layer large (A) to make it active.

From the Library panel, drag the Movie Clip, large_mc (B) onto the stage.

The position on the stage is unimportant, however to better see what you are doing, drag it to one side or the other of the main stage.

With large_mc still selected, open the Properties panel and give it an Instance Name: largeView.

Right-click on the Movie Clip to bring up the contextual menu and select Actions.

This will bring up the Actions panel. Enter the following code, exactly as shown (be sure to include the closing bracket on the last line):

onClipEvent (enterFrame) {

_root.largeView._x = (_root._xmouse * -1.5);
_root.largeView._y = (_root._ymouse * -1.5);

}

This code works as long as the large image is 2.5 times larger than the small image. The value “-1.5” controls the positioning of the mouse relative to the large view. If you think of the small view as being 1x and the large image as 2.5x, 1x – 2.5x = 1.5x. -1.5 is the value used in the code. Therefore, if your large image is 3 times larger than the small image, the formula would be 1x – 3x = 2x and -2 would be used instead of -1.5 in the code.

Close the Actions panel.

Create a new layer above large and name it glass. (Note: the order of the layers is important.)

At the bottom of the Tool panel, set the Stroke color (A) to transparent. The Fill color is unimportant.

Using the Oval Tool (B), draw a circle (hold down the SHIFT key as you drag to constrain to a circle shape).

In the Properties panel, make the diameter 140 pixels (C).

Right-click on the circle and select Convert to Symbol…

In the Symbol dialogue box, give the circle a Name of glass_mc and a Type of Movie Clip.

Close the dialogue box.

There should be a circle and small crosshairs in the center of your circle. In the Properties panel, give the Movie Clip an instance name of glassLens.

Right-click on the circle and choose Actions from the contextual menu. In the Actions panel, enter the following code:

onClipEvent (enterFrame) {

_root.glassLens._x = (_root._xmouse);
_root.glassLens._y = (_root._ymouse);

}

Close the Actions panel.

Right-click on the glass layer in the Timeline and choose Mask from the contextual menu.

The layers should appear as shown below and the circle will now be invisible.

Save the file.

Test the movie: Control > Test Movie.

If you want to add a bezel (rim) to the magnifying glass, create a new layer above glass and rename it bezel.

On this layer, draw a circle with a stroke color that will show against the background of your image.

In the Properties panel, change the diameter of the circle to 140 pixels and the stroke size to 2.00 pixels.

With the Selection Tool, double-click on the circle to enter edit mode.

Click once on the fill region of the circle to select it and press DELETE to erase it, leaving only the stroke.

Click on “Scene 1” at the top of the edit window to return to the stage.

Right click on the bezel and select Convert to Symbol…

In the Symbol dialogue box, give the symbol a Name of bezel_mc and the Type of Movie Clip.

Close the Symbol dialogue box. In the Properties panel, give the Movie Clip and instance name of bezelEdge.

Right-click on the Movie Clip and select Actions.

Enter the following code in the Actions panel:

onClipEvent (enterFrame) {

_root.bezelEdge._x = (_root._xmouse);
_root.bezelEdge._y = (_root._ymouse);

}

Close the Actions panel.

To make the cursor invisible, place your cursor in the keyframe of the bezel layer (A), right-click and select Actions (B).

In the Actions panel, enter the following code:

Mouse.hide();

Close the Actions panel. Save and test the movie.

You should now be able to insert the .swf file to your webpage.

Dec 28 2009

proofing your website on different browsers

Chances are that you have designed a website or two where your creativity pushed the limits of (specifically) Internet Explorer’s capacity to deal with it. I’ll bet that most web designers don’t use IE as their default browser. Being a Mac shop, I have struggled with a foolproof way to proof newly-minted websites in IE. I broke down and bought a used Windows laptop for that (sole) reason. It was less expensive than running Windows through Parallels on the Mac. Also, in that way I get to see the actual rendering of fonts and images at Windows screen resolutions. I am suspicious that using a Windows emulator on a Mac would not render the screen in the same way.

This method works well but Windows has a tendency to drop out of my network for no reason, especially if I have not been using it. When I need it the most it takes precious time to wade through the maze of Windows to find the one that allows changes to the IP addressing. When Internet access is finally restored I must install all of the system security and virus protection updates that I missed. I digress…

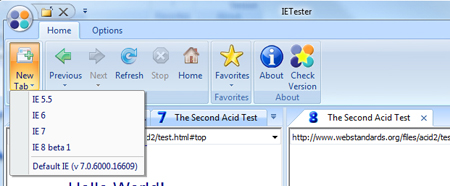
When it comes to proofing for IE I like IE Tester, which is a free utility from DebugBar. This utility permits live testing of the site in IE5 through IE8 in XP, Vista, and Windows 7 environments (you supply the OS). The nice thing about IE Tester is that the functionality of the site can be tested as well as the styling. If you’ve wondered whether the Javascript utility operates as intended, this is a good solution.

The one remaining problem is proofing on the other browsers that Windows supports. It means preserving archival versions of Firefox 2.0 or Opera 6.0. And there’s Chrome. I have not found an easy way to proof on earlier versions of browsers for either Mac or Windows.

That is until now. If you sometimes haunt the halls of Adobe Labs you may have heard of Adobe BrowserLab. If you have not, it is worth trying to get on board with their limited free preview.

This utility resides in “the cloud”, similar to Kuler (another worthwhile utility) so all you need to do is download a small app and use your Adobe registration to log in. BrowserLab renders screenshots of your site in Firefox 2.0, 3.0 and 3.5 on Windows XP and Mac OS X; Internet Explorer 6.X, 7.X, and 8.X on Windows XP; Safari 3.X and 4.X on Mac OS X; and Chrome 3.0 on Windows XP. This list will be updated as browsers are updated–soon I hope for Chrome on Mac OS X.

You access the utility from the Adobe BrowserLab website, provide your Adobe registration info (or sign up), choose the combination of browsers/OSs that you want to preview and feed it the URL of your site:

You can compare in a 2-up display or as an ‘onion skin’, showing two browsers superimposed, which is helpful for fine-tuning alignment. Also helpful is a ruler option to pinpoint an exact location.

The utility can also accessed through a Dreamweaver CS4 extension.

The most discouraging aspect of this otherwise very helpful utility is that it renders the page as a static screenshot. The dynamic functionality cannot be tested or compared. Still, I hope that Adobe continues to make this available, if not for free, at least as a low cost subscription.


Dec 27 2009

css techniques: text wrap around image

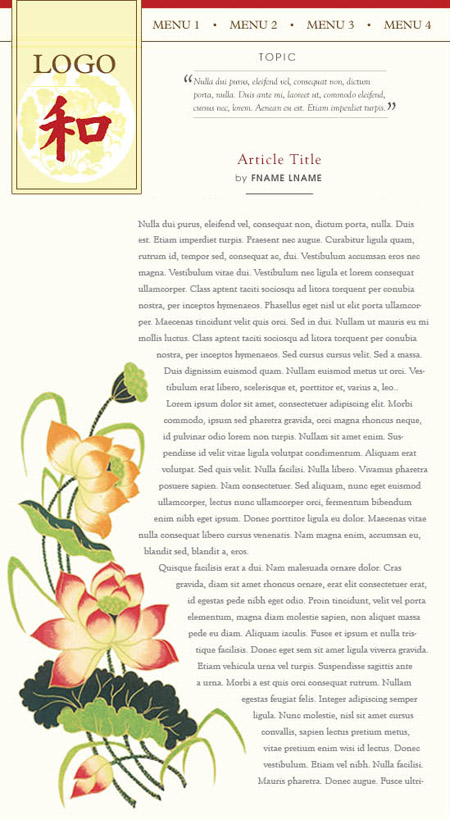
The challenge: I had designed a printed page layout with a different visual element on each page to help to break up rather long narrative. The client wanted this to be a template for her website, including the text-wrapped image. Below is a (different) page mock-up using a similar visual element in the lower left corner:

To make the page look similar to the printed version, the text to had to wrap around the image, not just squarely around an image with float:left styling. However, this is not as easy as it seems. I was familiar with the “sandbox’ technique, in which a series of sandbox DIVs is defined that block out the image so that the text can flow around them. This is cumbersome and a little time-consuming. However I stumbled upon a relatively simple technique that takes advantage of the <canvas> element.

By way of explanation, the <canvas> element “creates a fixed size drawing surface that exposes one or more ‘rendering contexts’, which are used to create and manipulate the content shown.” The term “rendering context” merely refers to either a 2D or (sometime in the future) a 3D image. To “draw” something, the <canvas> element is called by a script. In this case, Jacob Seidelin has developed a script, known as prettyfloat.js (download here).

Using this small script you simply give your image a CSS class of either “sandbag-left” or “sandbag-right”, depending on how your image should float. If the browser does not support <canvas> and image data access, a fallback mechanism simply sets the CSS float property to “left” or “right”, degrading to the old rectangular text wrap.

First, save the script with your project files (in this example to the same directory as the HTML file).

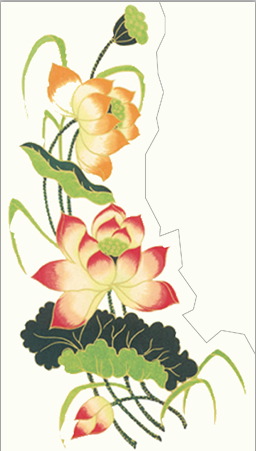
The image needs to be either .png or .gif to work properly, meaning it must have transparent pixels in which the text block will flow up next to the opaque pixels. To achieve this, the open the image in Photoshop, then:

  1. Open the Layers panel
  2. Double click on the Background layer to unlock it and make it available to transparency. This will now be labeled Layer 0.
  3. Create a new layer (Layer > New > Layer…) This will be a temporary layer on which you will draw a guide.
  4. Using the Polygonal Lassso tool, draw the guide leaving enough margin for the text:
  5. Using the Magic Wand tool, select the area to be made transparent
  6. IMPORTANT: Click on Layer 0 to make it the active layer
  7. Using the arrow keys on the keyboard, nudge the selected area 1 px to the right and 1 px up so there is no chance of a border of pixels along the straight edges
  8. Press the [delete] (or [Backspace]) key to erase the pixels:
  9. Save for Web & Devices using the PNG-24 preset

Now for the code:

In the <head> section of the HTML file, call the prettyfloat.js script:

<script src=”prettyfloat.js” type=”text/javascript”></script>

(Change the URL if you store your scripts in a separate directory)

The <body> section with just the wrapped text segment of the page is as follows:

<body>
<div class=”container”>
<div style=”position:relative; width:550px; height:450px;”> <img class=”sandbag-left” src=”flowers.png”>
<p>Lorem ipsum dolor sit amet, consectetuer adipiscing elit. Morbi commodo, ipsum sed pharetra gravida, orci magna rhoncus neque, id pulvinar odio lorem non turpis. Nullam sit amet enim. Suspendisse id velit vitae ligula volutpat condimentum. Aliquam erat volutpat. Sed quis velit. Nulla facilisi. Nulla libero. Vivamus pharetra posuere sapien. Nam consectetuer. Sed aliquam, nunc eget euismod ullamcorper, lectus nunc ullamcorper orci, fermentum bibendum enim nibh eget ipsum. Donec porttitor ligula eu dolor. Maecenas vitae nulla consequat libero cursus venenatis. Nam magna enim, accumsan eu, blandit sed, blandit a, eros.</p>
<p>Quisque facilisis erat a dui. Nam malesuada ornare dolor. Cras gravida, diam sit amet rhoncus ornare, erat elit consectetuer erat, id egestas pede nibh eget odio. Proin tincidunt, velit vel porta elementum, magna diam molestie sapien, non aliquet massa pede eu diam. Aliquam iaculis. Fusce et ipsum et nulla tristique facilisis. Donec eget sem sit amet ligula viverra gravida.</p>
</div>
</div>
</body>

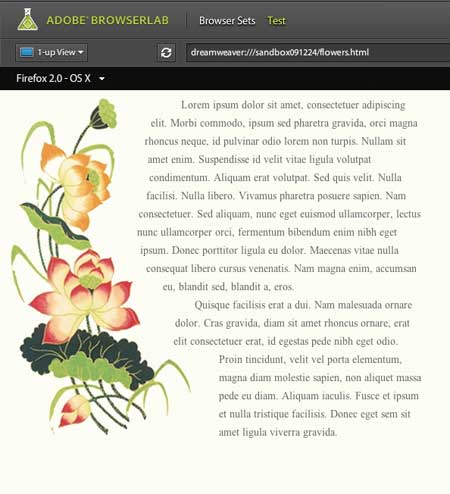
A test of how this renders in different browsers (using Adobe BrowserLab–more about that later) reveals that Firefox 2.0 on Mac OS X looks as intentded:

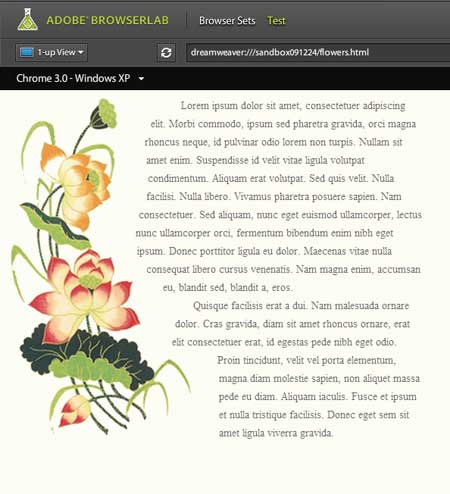
Chrome on Windows XP renders properly:

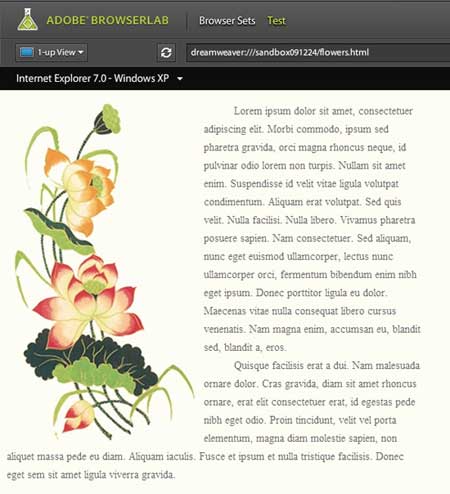
However, as expected, IE7 on Windows XP does not, though the results are acceptable (sort of):

Most newer browsers now support the <canvas> element so this is really is a relatively painless way to achieve a layout that has the look of a printed page.